|
Click here for complete Site Map
Please note - the text and images on this page were very kindly donated by Steven Weston to help other Optima owners service their cameras. I (Roland) have not yet worked on an Optima camera - but hopefully will extend and enhance the pages here as I discover more Optima repair info.
Agfa's Optima cameras are a range of 35mm models of the same basic body design. All have a built-in photoelectric exposure meter coupled to a scaleless shutter that permits shooting with virtually no camera settings at all. Essentially, they were "point and shoot" cameras designed and manufactured in the late 1950s and 1960s. They exhibit superb construction and manufacturing techniques that employed precision turning, milling and machining. Many of the camera parts are made from aluminium alloy and, as such, are quite soft and easily bent or broken if the repair person, you, does not take care.
The procedure described here applies to the original Optima model which was introduced in 1959. Many of this model's features were incorporated in later models: I, Ia, II, IIs, III, and IIIs. The "S" models featured a coupled rangefinder focusing system. Therefore, the "S" models may be quite different than what is described here.
(Note also that the Optima Reflex and Optima Parat are very different. Agfa also used the Optima name on various cameras into the 1980s - and these are not covered by these instructions either).
Most of these cameras are now about 40 years old. After so many years, many Optimas have cloudy, hazy or dim viewfinders due to deposits of dirt and chemical film on the inner surfaces of the viewfinder optical glass. Cleaning the viewfinder is relatively easy and the results will surprise you.
Requirements
You will need the following tools and materials.
Tools:
- Jeweller’s flat-blade screwdrivers
- Adjustable spanner wrenches (points and blades)
Materials:
- Cotton-tipped applicators
Top Plate Removal
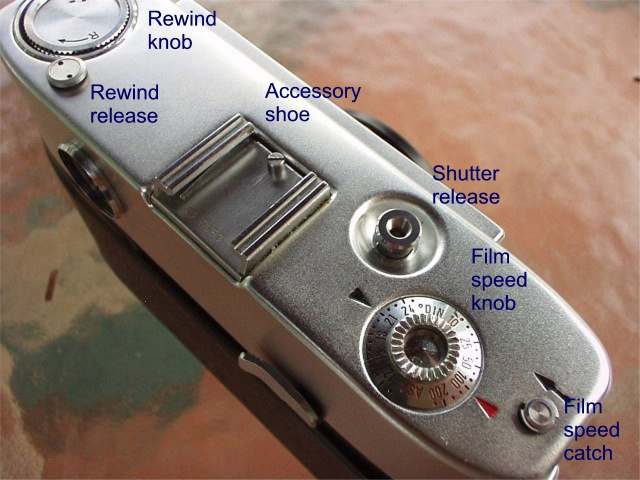
Removing an Optima's top plate is easy once a few assembly tricks are revealed. This picture shows the Optima Top Plate and the controls you'll have to remove
- Set the camera's Film Speed Knob to 100/21. This will make reassembly easier.
-
Use a spanner or divider to remove the Film Speed Catch and the centre bezel of the Film Speed Knob. Remove the Film Speed Knob.
-
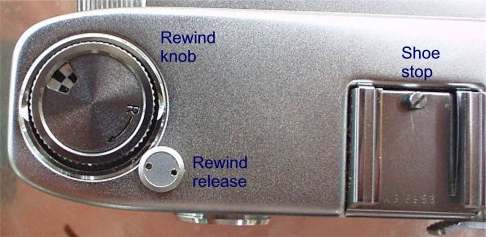
Use a spanner or divider to remove the Rewind Release. Use a screwdriver to remove the Shoe Stop.
-
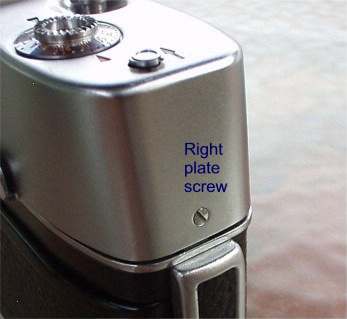
Use a screwdriver to remove the Right Plate Screw.
-
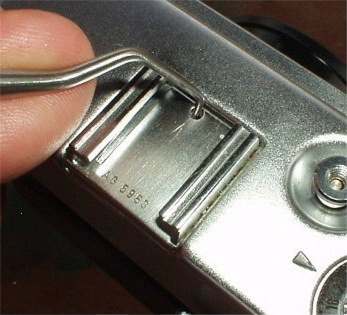
Use a dental pick to lift the Spring Clip up enough to clear the front edge and slide the plate back.
-
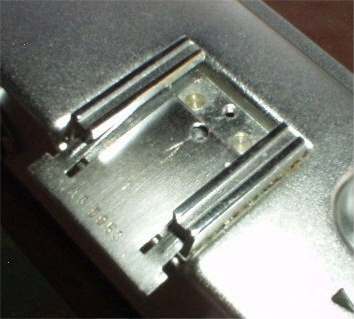
This photo shows the Spring Clip partially removed. Remove the Spring Clip by sliding it back. Remove the Black Screw that is beneath the Spring Clip.
-
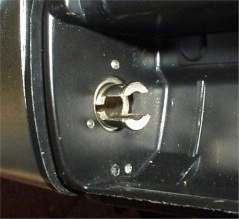
Using an angled dental pick, engage the hole in the Rewind Release Lever below the Rewind Release opening and release the Rewind Knob (see Step 9 photo). Open the camera back and with a screwdriver blade or other tool inserted in the Rewind Shaft Fork (see photo), turn the Rewind Knob counter-clockwise. Some knobs are pretty tightly attached.
-
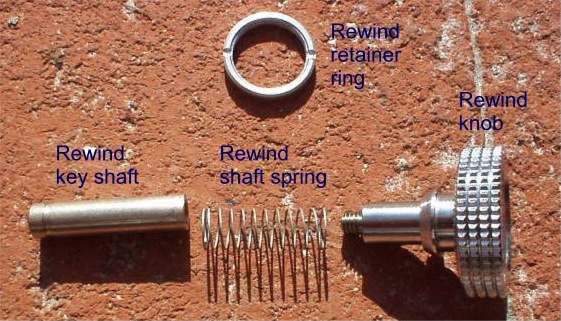
Continue to unscrew the Rewind Knob from the Rewind Key Shaft. When unscrewed completely, the Rewind Key Shaft will fall out of the centre of the Rewind Fork Shaft and the Rewind Shaft Spring can be removed from above. The photo shows these three parts and the Rewind Retainer Ring that will be removed in the next step.
-
The Rewind Retainer Ring is at the bottom of the Rewind Knob Well (shown already removed). This ring is made of very soft aluminium and can easily be damaged by your spanner during removal and reassembly -- be careful. Use a spanner to remove the Rewind Retainer Ring.
- Before removing the Top Plate, look into the Rewind Knob Well and the shafts. You should be able to see a Key Tab that is part of the Rewind Release Lever. It projects into the hollow shaft through a slot in the shaft. Using a dental pick, pull the Rewind Release Lever towards the back so that its Key Tab can no longer be seen. Once the Key Tab has been retracted, you can pull the Top Plate up and off of the camera. If the Key Tab hangs up, don't force the issue -- you don't want to bend the Rewind Release Lever -- just finesse it.
Got a question or can't find the info you are looking for? Click HERE to contact us.
Click here for main Repair Page
Click here for complete Site Map
|