 |
||||||||
|
|
||||||||
|
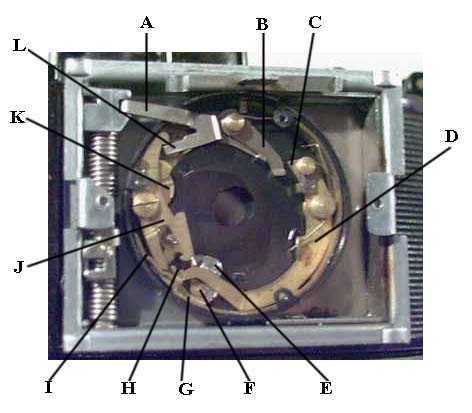
Our special thanks to Peter Wallage who very kindly provided this info to us some time ago. I’ve still not had a chance to try it out and as Peter wrote it from memory he admits it may not be 100% accurate - but its certainly the most comprehensive explanation of the Karat shutter I’ve seen. The Automat shutter on the 6.3 models is a simple, but ingenious, design, and there's not a lot goes wrong with it other than dirt and general gumming up. It usually responds well to flushing out and general cleaning, but it sometimes takes a LOT of flushing with lighter fluid or similar degreaser to get it working freely. In particular, the blades stick, so keep oil well away from them. The only trouble with flushing is that it tends to wash old oil and dirt on to the rear element of the lens. It's possible, though tricky, to clean this working through the shutter with a cotton bud and piece of lens tissue, but on mine I took the rear elements out to clean them. This isn't all that easy without also taking out the film gate, and this IS tricky. It's easy to break the casting. If you have to do it, let me know and I will give you a couple of tips. I've taken the liberty of copying your picture and labelling it with a few letters to make explanation of how it works easier.
When you press the shutter release you push down on lever A. The tail of this lever, B, pushes against a small spring-loaded pawl, C, which swings arm D on its pivot. Arm D is also spring loaded to return it its rest position shown in your picture. Moving on to the plated lever E which opens and closes the shutter blades. You say it seems disconnected from the rest of the mechanism - it's meant to be like that. It is also spring loaded to keep the blades closed. It has a small brass rivet, F, on it, and this rivet is sloped at an angle to form a ramp. When lever D pivots, its tail, G, rides up over the ramp rivet on E without moving E. When B reaches the end of its down travel, the pawl C drops off the end and allows lever D to return to its rest position. As it does so, its tail, G, pushes against the high end of ramp F to open the shutter blades. When they reach the fully open position, the ramp F has swung slightly so that tail G can pass it. When D comes back to its rest position, the pawl C drops off the end of B ready for the next time you press the shutter release. Going back to the start of things, the lever A has an arm which I' ve labelled L. When you press on the shutter release, this arm L lifts the top end of a lever J. There's a fork on the bottom end of J which allows a small raised part, H, of lever D to move up inside it. As it does so it pushes on the tail end of a lever K, underneath J. The top end of K has a toothed rack which engages with a pinion on a brass wheel which acts as an inertia damper. Also, you'll see that the speed selector slider moves a long curved brass strip which ends in a sloped ramp I. This ramp moves lever J round which governs the amount by which the toothed rack of lever K moves the inertia damping wheel. Depending on how far the rack engages with the damper it slows down the return of lever D to give faster or slower shutter opening. When you move the speed slider to B, the curved strip I moves right out of the way allowing lever J to move anticlockwise. This brings a small piece on the end of the fork against the end H of lever D and stops it returning until you let go of the shutter release and push J back clockwise. It's been quite a long explanation, but I wanted to go through each movement in turn. In practice, several things happen at the same time, but if you watch carefully you can sort each stage out as the shutter operates. Most faults on this shutter are caused by sticking blades, sticking pawl C, or a sticking lever K and gummed up inertia wheel, or possibly a broken or slipped spring on lever E. The answer is flushing and cleaning. Some of the levers are riveted in position, you can remove lever J by undoing its screw so you can get to the inertia wheel. Be careful when you put J back to get its spring properly positioned. Oh yes, the speed selector slider will lift out, and can be put back, ONLY when the long curved strip is moved fully anticlockwise to give clearance for the tang end of the slider to move past the shutter casing. You mentioned you think you might also have trouble with the wind-on/shutter release interlock. This isn't difficult to sort out once you get the top off. To take the top off, unscrew the button on the end of the shutter release rod, undo the screw holding the wind-on knob, take out the two screws holding the strap lugs, and the top just lifts off. Be careful with the release rod, it's got a cut-out in it to take the Time exposure lever, this cut-out weakens the rod. I've found several Karats where the rod has broken at this point. There are a few other places where old Karats give problems because the diecast alloy tends to grow white crystals which stick things up a bit. It sometimes happens with the little diecast 'cage wheel' which turns the film transport sprockets. The alloy also gets rather brittle with age, so don't force anything! Karats weren't the highest precision 35mm cameras, but they weren't cheapened by penny-pinching. Money was saved by very clever production engineering. In their day they were excellent value for money and very popular. Most of them can still be fettled back into working order after anything up to 67 years use and neglect. Good luck with yours. Got a question or can't find the info you are looking for? Click HERE to contact us. |
|
All text and images Copyright © 2000-2011 Roland Givan, unless otherwise stated. All Rights Reserved. |
|
[Home Page] [Karat Update] |