|
Click here for complete Site Map
Thanks to Juan Trinidad of the Philippines who has kindly provided the information in Italics on this page.
Cleaning the rangefinder
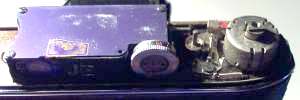
I cleaned the rangefinder by simply disassembling the top of the camera. The innards of the rangefinder is quite simple, almost no danger of not being able to put it back together again. There are three more screws on top of the rangefinder assembly inside.

Fig 1, View underneath top plate before opening rangefinder box.

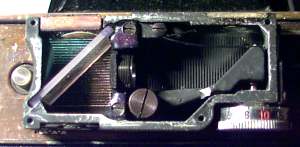
Fig 2, Rangefinder box with lid removed.
I unscrewed two lenses from the rangefinder and cleaned it with lens cleaning fluid and a chamois. The other lenses were cleaned by tying lens chamois on the tip of a cotton bud and putting fluid on it as well. The rangefinder is now as clear as my SLR's.
Much more detailed info on cleaning the Agfa Isolette III rangefinder can be found HERE.
Vertical alignment of rangefinder
I recalibrated the vertical alignment of the rangefinder by turning a screw on the lens that is mounted on a spring mechanism (at the middle of rangefinder assembly). Turning aligns vertically the rangefinder image and the shadow image (for focusing).
Horizontal alignment of rangefinder
With the top off your camera to expose the rangefinder, mount the camera on a tripod 1.5 (from the lens) meters from a subject. (I used a page I printed on my computer with grid lines to make focusing easier. Also, I assume focusing on a two dimensional subject might be more accurate) Set the rangefinder knob to 1.5 meters. If the image is in focus "Bingo" you got it.
If image is not is focus, turn the knob until it is. If the movement is not enough to get the image to focus, remove the set screw at the back of the rangefinder knob. This set screw limits focusing movement. Continue to focus image. Once focused , do not turn knob!
Loosen the two small set screws on the knurled side of the focusing knob. Note that the centre of the focusing knob is made of brass and has three holes in its centre. Grip the holes with a pointed set of pliers by inserting it into the two outer holes to prevent the centre from moving. Adjust by sliding the knurled knob to 1.5 meter reading while holding the brass centre of the knob at its focused position. If the knurled knob is too hard to turn, you may have to dip it in WD-40, Acetone or contact cleaner overnight (which ever you have handy). (The knob is removed by taking out three screws at the bottom of the rangefinder assembly and simply turning it till it pops off)
The point is to focus the image 1.5 meters away from you and getting a 1.5 meter reading on your rangefinder.
Now, do the same procedure for the infinite setting. The subject then should be a well lighted outdoor structure about 1/2 mile away. This part was easy for me as I live on the 8th floor of a building. RETURN THE SET SCREW AT THE BACK OF THE KNOB TO STOP THE KNOB AT INFINITE SETTING!!
Note: If your are focused at 1.5 meters, the infinite setting should be all right. Make minor adjustments to compromise between the 1.5 meter and the infinite reading if you are not satisfied with the results. VOILA. Rangefinder calibrated!
Got a question or can't find the info you are looking for? Click HERE to contact us.
Click here for main Repair Page
Click here for complete Site Map
|


